Category: Kitchen

Kitchen is for cozy, low-stress cooking — simple recipes, comforting staples, and printable kitchen helpers. Everything here is designed to feel doable on busy days (and especially on tender ones).

  • I’m Tired Dinner: Creamy Pesto Gnocchi (One Pan, 15 Minutes)

    I’m Tired Dinner: Creamy Pesto Gnocchi (One Pan, 15 Minutes)

    Some nights you don’t want to cook—you just want dinner to happen.
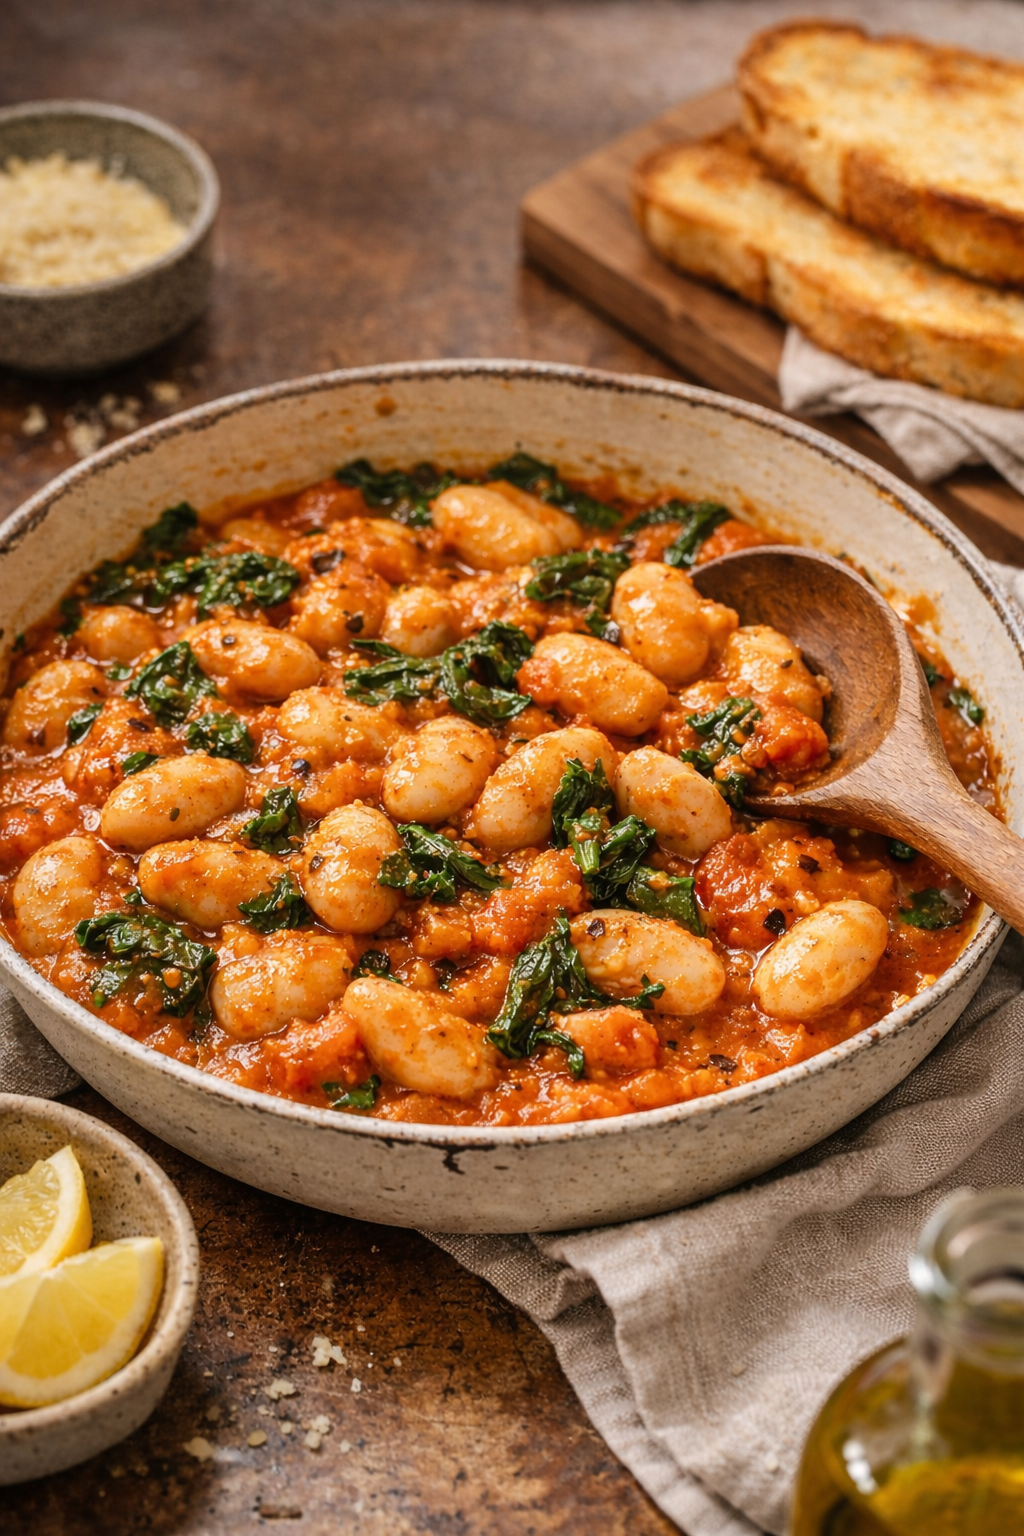
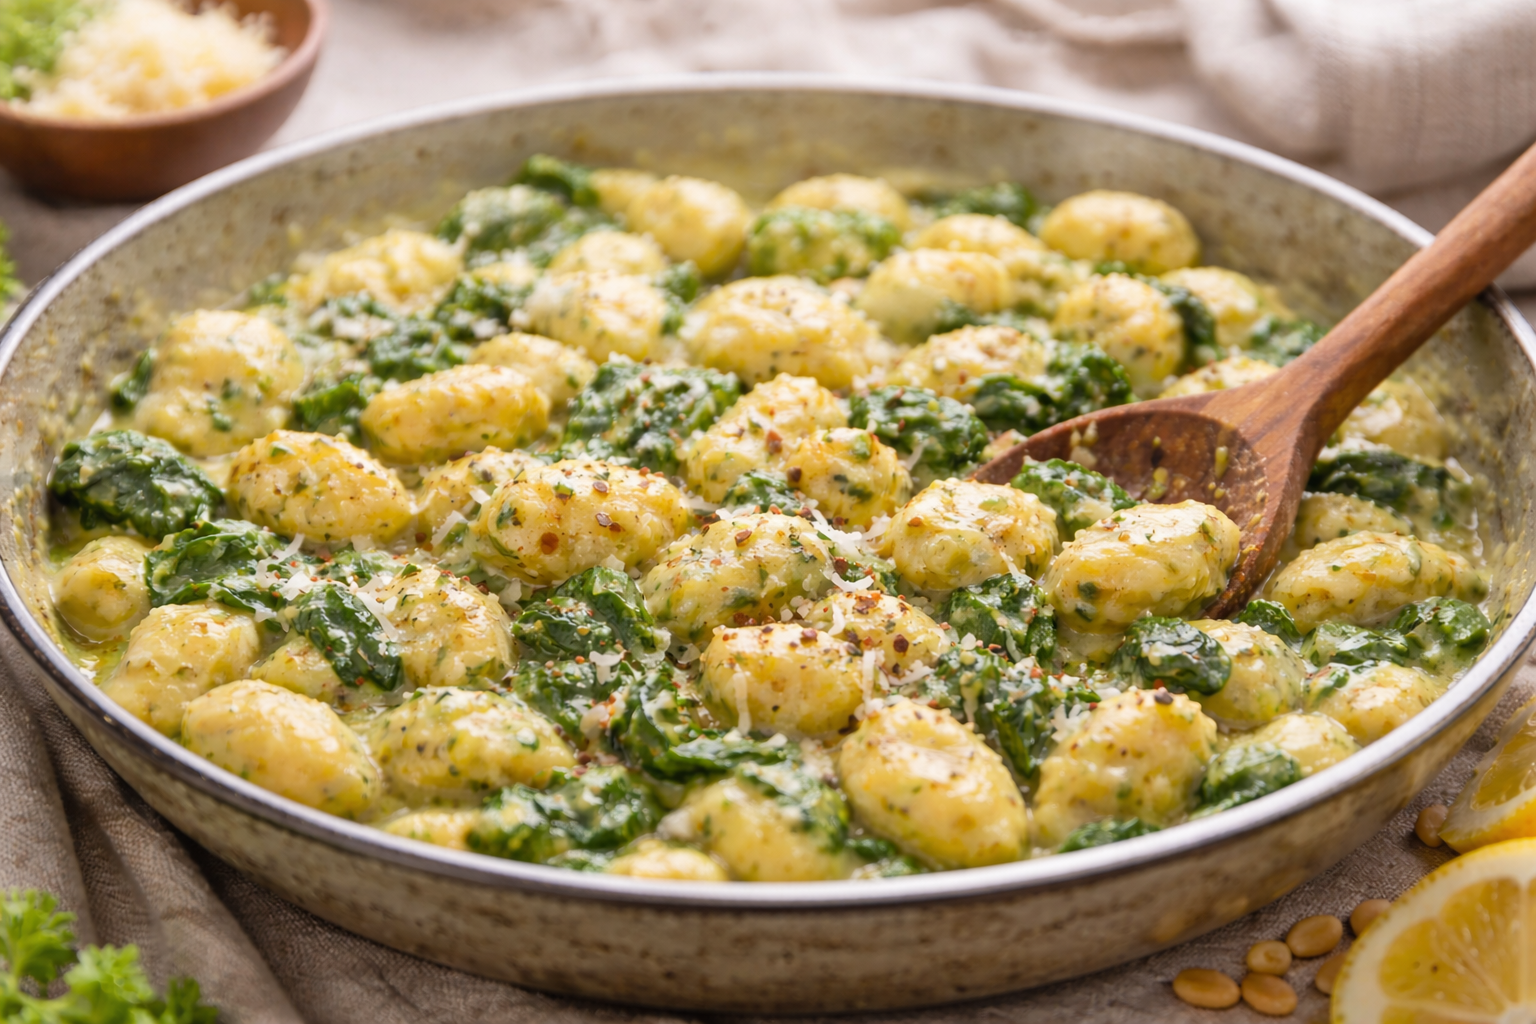
    This creamy pesto gnocchi is my go-to “I’m tired” meal: one pan, minimal chopping, cozy and filling, and it still feels a little special.

    It’s also incredibly flexible: add a handful of spinach, toss in frozen peas, or top it with a fried egg or leftover chicken.

    Creamy Pesto Gnocchi (One Pan, 15 Minutes)

    Time: 15 minutes
    Servings: 2–3
    You’ll need: 1 large skillet + spoon

    Ingredients

    • 1 tbsp butter (or olive oil)
    • 2–3 cloves garlic, minced (or 1 tsp garlic powder)
    • 16 oz (450 g) shelf-stable potato gnocchi
    • 1/2 cup (120 ml) broth (chicken or veggie)
    • 1/3 cup (80 ml) cream or half-and-half (or coconut milk for dairy-free-ish)
    • 3–4 tbsp pesto (store-bought is perfect)
    • 2 packed cups baby spinach (optional but recommended)
    • 1/4 cup grated Parmesan (optional)
    • Salt + black pepper
    • Optional toppings: chili flakes, lemon zest, toasted pine nuts, a fried egg

    Instructions

    1. Sauté the garlic.
      Heat butter in a large skillet over medium heat. Add garlic and cook 30 seconds (just until fragrant).
    2. Cook the gnocchi.
      Add gnocchi and stir to coat. Pour in broth, cover (or partially cover) and cook 3–4 minutes, stirring once, until the gnocchi is tender.
    3. Make it creamy.
      Lower heat to medium-low. Add cream and pesto. Stir gently until glossy and warmed through (about 1–2 minutes).
    4. Wilt the greens.
      Add spinach and stir until it collapses (30–60 seconds). If using Parmesan, stir it in now.
    5. Taste + finish.
      Add black pepper and salt as needed. Serve immediately with chili flakes or lemon zest if you want a little lift.

    Tired-dinner shortcuts (zero shame)

    • No fresh garlic? Use garlic powder.
    • No spinach? Frozen peas or a handful of arugula works.
    • Want protein? Add a drained can of white beans, leftover chicken, or top with a fried egg.
    • Need it lighter? Use milk + a spoon of cream cheese (or skip dairy and go coconut milk + extra pesto).

    Storage & reheating

    This is best fresh, but leftovers keep 2–3 days in the fridge. Reheat gently with a splash of water or milk to loosen the sauce.


    FAQ

    Can I use frozen gnocchi?
    Yes—add 1–2 extra minutes cook time.

    Can I make it dairy-free?
    Use olive oil instead of butter + coconut milk (or an unsweetened plant cream). Skip Parmesan.

    What pesto works best?
    Basil pesto is classic, but kale pesto or sun-dried tomato pesto is also amazing.


    Thanks for being here. If this one felt doable today, these earlier “I’m Tired Dinner” posts might help too:

  • I’m Tired Dinner: Lemon Garlic Chicken & Orzo (One Pan)

    I’m Tired Dinner: Lemon Garlic Chicken & Orzo (One Pan)

    A tiny note before we cook

    This is part of my I’m Tired Dinner series: cozy, low-effort meals for the nights when you want something warm and satisfying—without a long list of steps.

    If you’re caring for others (or simply carrying a lot), dinner doesn’t need to be perfect. It just needs to be possible.


    Why you’ll love this one

    • One pan (less cleanup)
    • Comforting + bright (lemon + garlic, but still cozy)
    • Feels “real” without being complicated
    • Great for leftovers (it reheats beautifully)

    Ingredients (serves 2–3)

    • 2 chicken thighs (boneless/skinless) or 2 small chicken breasts
    • 1 tbsp olive oil
    • 3–4 cloves garlic, minced
    • 1 tsp dried oregano (or Italian seasoning)
    • 1/2 tsp salt + black pepper
    • Zest of 1 lemon + 2 tbsp lemon juice
    • 1 cup orzo
    • 2 1/2 cups chicken broth (or stock)
    • 1 cup baby spinach (optional but nice)
    • 2 tbsp grated parmesan (optional)
    • Optional: a handful of chopped parsley

    Easy swaps

    • No orzo? Use small pasta, couscous, or even rice (see notes).
    • No spinach? Frozen peas work great.

    Quick steps (no fuss)

    1. Season the chicken. Pat dry, then season with salt, pepper, oregano, lemon zest.
    2. Sear (2–3 minutes per side). In a large pan, heat olive oil. Sear chicken until lightly golden. Remove to a plate (it will finish cooking later).
    3. Garlic + orzo. Lower heat, add garlic for 20–30 seconds. Stir in orzo for 30 seconds so it gets lightly coated.
    4. Add broth + lemon. Pour in broth and lemon juice. Stir.
    5. Nest chicken back in. Place chicken on top. Cover and simmer 10–12 minutes, stirring orzo once or twice so it doesn’t stick.
    6. Finish. When orzo is tender and chicken is cooked through, stir in spinach until wilted. Add parmesan if using.
    7. Serve. Taste, add more lemon/pepper if you want, and call it dinner.

    “I’m tired” tips (these matter)

    • If the pan looks dry before the orzo is tender: add a splash of broth/water and keep going.
    • If using chicken breast: pull it a little earlier if it’s done, so it stays juicy.
    • This is a great “bowl dinner” with a little extra olive oil on top.

    Variations (same vibe, different day)

    • Creamy version: stir in 2 tbsp cream cheese or a splash of cream at the end.
    • Tomato version: add 1–2 tbsp tomato paste with the garlic, then continue.
    • Veggie boost: add chopped zucchini or mushrooms right after garlic.

    Series notes

    I’m Tired Dinner is a collection of small, comforting meals for real life—when energy is low and warmth matters.

    Previous posts in the series:

  • I’m Tired Dinner: Creamy Tomato Butter Beans (One Pan)

    I’m Tired Dinner: Creamy Tomato Butter Beans (One Pan)

    A tiny note before we cook

    This post is part of my I’m Tired Dinner series: low-effort, comforting meals for the days when you want something warm and satisfying—without a lot of steps.

    Some nights you don’t need a “recipe,” you need a small win. This is that: one pan, pantry staples, and a cozy bowl you can eat with toast.


    Why you’ll love this one

    • One pan, minimal dishes
    • Pantry-friendly (beans + tomato)
    • Cozy and creamy without heavy effort
    • Easy to adapt with whatever you have

    Ingredients (serves 2)

    • 1 tbsp olive oil
    • 3–4 cloves garlic, minced (or 1 tsp garlic powder in a pinch)
    • 1/2 tsp dried oregano (or Italian seasoning)
    • Pinch chili flakes (optional)
    • 1 can butter beans / lima beans, drained and rinsed (about 400 g / 14 oz)
    • 1/2 cup (120 ml) tomato passata or crushed tomatoes
    • 2–4 tbsp water or broth (as needed)
    • 2 big handfuls baby spinach (or chopped kale)
    • Salt + black pepper
    • 1–2 tsp lemon juice or a tiny splash of vinegar (optional but lovely)

    To serve (choose your cozy):

    • Toast, garlic bread, or warm pita
    • A sprinkle of parmesan (optional)
    • A drizzle of olive oil (optional)

    15-minute method (one pan)

    1. Warm the oil in a pan over medium heat. Add garlic, oregano, and chili flakes. Stir for 30–60 seconds (don’t let garlic brown too much).
    2. Add tomatoes and a pinch of salt + pepper. Let it simmer 2 minutes.
    3. Add butter beans plus 2 tbsp water/broth. Stir and simmer 5 minutes.
    4. Make it creamy: lightly mash a small portion of the beans with the back of your spoon (this thickens the sauce fast). Add a splash more water if needed.
    5. Add spinach and stir until wilted (1–2 minutes). Taste and adjust salt/pepper.
    6. Finish with lemon juice (or vinegar) if using. Serve immediately with toast.

    Variations (use what you have)

    • More protein: stir in a handful of shredded chicken, or crack an egg in and cover until set.
    • More veg: mushrooms, zucchini, or frozen peas work great.
    • More cozy: add a spoon of cream/Greek yogurt at the end (off heat).
    • No butter beans? Use cannellini, chickpeas, or any white bean.

    Leftovers

    Keeps in the fridge 2–3 days. Reheat with a splash of water to loosen the sauce. Perfect with toast the next day.


    A tiny ritual (Little Home Rituals moment)

    While it simmers, take one deep breath and unclench your shoulders. You’re feeding yourself. That counts.


    Series notes

    I’m Tired Dinner is a collection of small, comforting meals for real life—when energy is low and warmth matters.

    Previous post in the series:

  • Peach Crumb Bars with a Shortbread Base

    Buttery shortbread + jammy peaches + golden crumble… basically a hug in dessert form.

    If winter had a dessert personality, it would be something like this: warm, sweet, a little messy in the best way, and completely unfazed by the fact that it’s snowing outside. These peach crumb bars are my “I want something homemade but I also want to sit down soon” kind of treat.

    They’re simple, pantry-friendly, and forgiving. The base and topping are the same dough (bless), and the middle is just juicy peaches with a little help from sugar and spice. You get a buttery shortbread bottom, a soft fruit layer, and a crunchy crumble top that makes your kitchen smell like “someone has their life together.” (Even if you don’t. I don’t.)

    Why you’ll love these

    • One bowl-ish (because who wants more dishes?)
    • Same mixture for base + crumble topping
    • Works with fresh, frozen, or canned peaches
    • Cozy dessert energy that feels homemade without feeling complicated

    Ingredients (8–12 bars)

    For the crust + crumble

    • 2 ½ cups (310 g) all-purpose flour
    • ¾ cup (150 g) sugar
    • 1 tsp baking powder
    • ¼ tsp salt
    • 1 tsp ground cinnamon (optional, but cozy)
    • 1 cup (225 g) cold butter, cubed
    • 1 egg
    • 1 tsp vanilla extract (optional)

    For the peach filling

    • 3 cups peaches, sliced (fresh/frozen/canned*)
    • 2–3 tbsp sugar (adjust to taste)
    • 1 tbsp lemon juice
    • 1 tbsp cornstarch
    • ½ tsp cinnamon (optional)
    • Pinch of salt

    *If using canned peaches: drain well. If using frozen: thaw and drain excess liquid if very watery.


    Instructions

    1) Prep

    • Preheat oven to 350°F / 175°C
    • Line an 8×8 inch (20×20 cm) pan with parchment (or grease it well).

    2) Make the crust/crumble mixture

    In a bowl, mix flour, sugar, baking powder, salt, and cinnamon.
    Add cold butter and rub/cut it in until it looks like coarse crumbs.

    Add egg + vanilla and mix until it becomes a crumbly dough that holds together when squeezed.

    Set aside about 1 cup of the mixture for the topping.

    3) Press the crust

    Press the remaining dough firmly into the bottom of the pan.
    Bake for 10 minutes (this helps it stay nice and sturdy).

    4) Mix the filling

    Toss peaches with sugar, lemon juice, cornstarch, cinnamon, and salt.

    5) Assemble

    Spread peach filling over the warm crust.
    Sprinkle the reserved crumble evenly on top.

    6) Bake

    Bake for 35–45 minutes, until golden and bubbling at the edges.

    7) Cool (important!)

    Let it cool at least 1 hour before slicing—otherwise it will be delicious lava chaos.

    Dust with powdered sugar if you want them to look extra “bakery window.”


    Serving ideas (aka: choose your cozy level)

    • Warm bar + vanilla ice cream = elite winter comfort
    • Warm bar + plain yogurt = “I’m being responsible” dessert
    • Cold from the fridge = midnight snack energy

    Storage

    • Room temp: 1 day (covered)
    • Fridge: 4–5 days
    • Freezer: up to 2 months (wrap individually)

    Little note from my kitchen

    This is one of those recipes that makes the whole day feel softer. Even if it’s grey outside. Even if your to-do list is yelling. Even if you started the bake “just to use up fruit” and ended up eating the corner piece standing at the counter like a little kitchen gremlin. (No judgment. That’s tradition.)

    If you make these, tell me: team extra crumble or team extra fruit?

  • The “I’m Tired” Dinner: Creamy Garlic Chickpeas & Toast

    The “I’m Tired” Dinner: Creamy Garlic Chickpeas & Toast

    Some days call for a full-on cooking project… and some days call for a warm bowl of “please feed me quickly”. This is the second kind of day.
    This creamy garlic butter chickpea skillet is my cozy, minimal-effort dinner for nights when the snow is doing its dramatic thing outside and I’m doing my dramatic thing inside (mostly staring into the fridge like it might offer emotional support).

    Creamy Garlic Butter Chickpeas (15 minutes, one pan)

    What you’ll love

    • Pantry-friendly (hello, canned chickpeas!)
    • Comforting and creamy without being fussy
    • Ready in about 15 minutes
    • Works with toast, rice, pasta, or just a spoon

    Ingredients (serves 2)

    • 2 cans chickpeas, drained and rinsed
    • 2 tbsp butter (or olive oil)
    • 3–4 cloves garlic, minced
    • 1 tsp paprika (smoked if you have it)
    • 1/2 tsp dried thyme or Italian seasoning
    • Salt + black pepper
    • 1/2 cup cream (or half-and-half / oat cream)
    • 1–2 big handfuls spinach (optional but nice)
    • Squeeze of lemon (optional but highly recommended)
    • To serve: toasted bread, rice, pasta, or couscous
    • Optional toppings: chili flakes, grated parmesan, chopped parsley

    How to make it

    1. Warm the butter in a skillet over medium heat.
    2. Add garlic and cook 30–60 seconds until it smells amazing (don’t let it brown—garlic gets bitter when it’s having a bad day).
    3. Stir in paprika + thyme, then add chickpeas. Cook 3–4 minutes, stirring, until they’re hot and lightly coated.
    4. Pour in the cream and simmer 3–5 minutes until it turns glossy and slightly thick.
    5. Add spinach (if using) and let it wilt.
    6. Season with salt/pepper, then finish with a lemon squeeze for brightness.
    7. Serve over toast/rice/pasta. Eat immediately while it’s cozy and perfect.

    Quick variations

    • Tomato version: add 1–2 tbsp tomato paste with the garlic + spices.
    • Spicy version: chili flakes or a spoon of harissa.
    • “Protein boost”: stir in shredded rotisserie chicken or a fried egg on top.
    • No cream? Use a splash of milk + 1 tbsp cream cheese or a spoon of plain yogurt off-heat.

    Storage

    Keeps in the fridge for 2–3 days. Reheat gently with a splash of water/milk to loosen the sauce.

    Closing:
    If you make this, tell me what you served it with—toast, rice, pasta, or straight-from-the-pan-with-a-fork (no judgment, only admiration).

  • Cozy Winter Apple Crumble You Can Make in One Pan

    Cozy Winter Apple Crumble You Can Make in One Pan

    When the world outside looks like powdered sugar and the air hurts your face, I don’t want “fancy.” I want warm, cozy, and slightly dramatic—in the best way.

    This apple crumble is my favorite snow-day dessert because:

    • it smells like a hug (butter, cinnamon, vanilla… you know),
    • it’s forgiving (no perfect dough, no chilling, no stress),
    • and it comes out bubbling like it’s auditioning for a winter movie scene.

    Make it once and you’ll start hoping for “just one more snowy weekend.” (I’m not saying this dessert controls the weather… but I’m not not saying it either.)


    What you’ll love about this crumble

    • Warm + cozy: best served straight from the oven
    • Quick to prep: about 15 minutes of hands-on time
    • Very forgiving: swap fruits, spices, or nuts without ruining it
    • Photogenic: golden crumb + bubbling edges = instant “pin it” energy

    Ingredients (serves 4–6)

    Apple filling

    • 6 medium apples (about 900–1000 g / 2 lbs)
    • 2–3 tbsp brown sugar (or maple syrup)
    • 1 tbsp lemon juice
    • 1 tsp cinnamon
    • 1/2 tsp vanilla extract
    • 1 tbsp cornstarch (optional, helps thicken)
    • Pinch of salt
    • Optional: 1/4 tsp cardamom (highly recommended for that “winter magic” note)

    Crumble topping

    • 100 g (about 1/2 cup) butter
    • 120 g (1 cup) rolled oats
    • 100 g (3/4 cup) all-purpose flour
    • 80–100 g (1/2 cup) brown sugar
    • 1 tsp cinnamon
    • Pinch of salt
    • Optional: handful of chopped walnuts or pecans

    Instructions

    1) Heat the oven

    Preheat to 180°C / 350°F.

    2) Make the filling

    Peel (or don’t) and slice the apples. Toss with sugar, lemon juice, cinnamon, vanilla, salt, and cornstarch if using.
    Spread into a 10-inch oven-safe skillet or a medium baking dish.

    3) Brown the butter (tiny step, huge flavor)

    Melt butter in a small pan over medium heat until it turns golden and smells nutty (about 3–5 minutes).
    Take it off the heat right when you see brown bits at the bottom—don’t walk away. Butter is fast and dramatic.

    4) Make the crumble topping

    In a bowl, mix oats + flour + sugar + cinnamon + salt (and nuts if using).
    Pour in the browned butter and stir until you get chunky crumbs.

    5) Bake

    Scatter topping over apples. Bake 30–40 minutes, until the edges bubble and the top is golden.

    6) Serve (the important part)

    Let it cool 10 minutes (so you don’t burn your tongue like I always do).
    Serve warm with:

    • vanilla ice cream
    • whipped cream
    • or plain Greek yogurt if you want to feel “responsible.”

    Tips & Variations

    • Best apples: a mix of tart + sweet (Granny Smith + Gala, Braeburn, Honeycrisp, etc.)
    • No oats? Use extra flour + a bit of chopped nuts.
    • Want it extra cozy? Add a pinch of nutmeg or cloves.
    • Make-ahead: assemble, refrigerate, bake when needed (add 5–10 minutes).
    • Leftovers: keep covered in the fridge 3 days; reheat in oven or air fryer for crisp topping.

    A tiny “snow-day” serving idea

    Put the crumble on a plate, add a scoop of ice cream, and drizzle a little maple syrup.
    Then stand by the window, watch the snow, and pretend you’re the main character. This is non-negotiable.

  • Homemade Egg Noodles for Cold Days (Our No-Water, No-Salt Comfort Staple)

    It’s properly cold outside—the kind of cold that makes the whole world feel a little quieter. The windows look frosty, the kitchen feels like the warmest place on earth, and suddenly all we want is soup. Not the fancy kind. The kind that steams up your glasses and makes you sigh on purpose.

    So we did what we always do when winter gets personal: we made noodles.

    This is one of our absolute favorites—thin, delicate cérnametélt (Hungarian-style fine egg noodles). We almost always cook it straight into soup, where it turns a simple broth into something that feels like home.

    And the best part? It’s just eggs and flour. No salt. No water. No shortcuts. Just a dough that takes its time—like we do on days like this.


    The Cozy Noodle We Always Make for Soup

    If you grew up with chicken soup and homemade noodles (or you just wish you had), this is your sign. These noodles are light but comforting, and because they dry well, you can make a big batch and keep it for weeks.

    We make ours the old-fashioned way:

    • mixed by hand
    • rested for at least an hour
    • rolled out with a machine
    • dried slowly for days in a cool room

    It’s not fast. But it’s deeply satisfying.


    Ingredients (Big Batch)

    • 10 eggs
    • 1 kg all-purpose flour (plus a little extra for dusting)

    That’s it.

    No salt. No water.
    The eggs do all the work here. (And in soup, you can season the broth properly—so the noodles stay gentle and neutral, like they’re meant to be.)


    How We Make Cérnametélt (Step-by-Step)

    1) Make the dough (by hand)

    We tip the flour onto the counter (or into a very large bowl), make a well, and crack in the eggs.

    Then we mix slowly at first—pulling flour in from the edges—until it turns into a shaggy, stubborn dough. And yes… it’s stubborn. At first it looks like it will never come together.

    But it does. You just keep kneading.

    I knead by hand until it’s firm, smooth, and elastic—and then a bit more. This dough should feel strong and dense, not soft.

    2) Rest (minimum 1 hour)

    Once the dough is kneaded, we cover it (bowl, cloth, wrap—whatever you like) and let it rest for at least an hour.

    This rest is non-negotiable.
    It relaxes the gluten and makes rolling so much easier later. It also feels like the dough is exhaling.

    3) Roll it out (with a machine)

    After resting, we cut the dough into manageable pieces and run it through the pasta machine.

    We start thick, fold it a few times, then gradually go thinner. For cérnametélt we aim for thin sheets—delicate, but not paper-thin.

    4) Cut into fine noodles

    Then we cut it into thin strands (the “thread noodle” look). If your cutter does wider noodles, you can still use them—but the fine ones are magic in soup.

    5) Dry slowly (for days)

    Here’s our winter method: we dry the noodles in a cool room, because honestly, our house is basically a drying room in winter.

    We spread the noodles out (or drape them) and let them dry for several days before storing.

    This matters:

    • If you pack them too early, they can get slightly soft or clump.
    • Fully dried noodles store beautifully and stay separate.

    6) Store in a box

    Once they feel completely dry—crisp and breakable—we transfer them to a box or container and keep them in the pantry.


    How We Cook It (Straight Into Soup)

    Most of the time, we cook these noodles directly in simmering soup for just a few minutes—until tender. Because they’re egg-rich, they cook quickly.

    If you’re making broth, this is the moment where everything turns into comfort food.


    Notes From Our Kitchen

    • No salt in the dough: we prefer seasoning the soup instead. The noodles stay soft and gentle.
    • No water: eggs are enough—and it helps the noodles dry and store well.
    • Drying time depends on your room: if it’s warm or humid, it may take longer. In winter, it’s perfect.

    A Little Winter Ritual

    This is one of those quiet, old-fashioned kitchen rituals that makes the cold feel less annoying. You’re not just cooking—you’re stocking up on comfort. You’re making future-you very happy.

    And honestly? When the noodles are drying on the counter and the house smells like soup, winter doesn’t feel quite so rude.

    If you make this, I hope it becomes one of your cozy staples too.

  • My Additive-Free Homemade Seasoning Mix (Made from Summer Memories)

    My Additive-Free Homemade Seasoning Mix (Made from Summer Memories)

    Today I reached for my favorite seasoning blend in the kitchen… and the jar was empty.
    You know that moment—where your brain goes: “No problem!” but your soul goes: “Tragedy.” 😄

    So I did what I always do: I marched to the pantry like a tiny kitchen detective and pulled out my stash of home-dried herbs and vegetables. Because summer and autumn did not dry themselves for nothing.


    The idea: one jar = instant flavor

    This is my “sprinkle-on-everything” blend. It’s:

    • delicious
    • additive-free
    • and honestly… it tastes like my own garden + my own effort, which is the best seasoning of all.

    And the best part? I can mix a new batch anytime.


    What goes into my homemade seasoning blend

    It changes a little every time (because I use what I have), but my usual favorites are:

    🌿 Dried herbs

    • Marjoram
    • Oregano
    • Basil
    • Parsley

    🥕🧄 Dried vegetables (the secret upgrade)

    • Carrot
    • Beetroot
    • Horseradish
      …and honestly, sometimes “whatever else I dried and forgot about,” which keeps life exciting.


    How I mix it (the cozy, no-rules method)

    1. I scoop a bit of each dried ingredient into a bowl
    2. Mix it together
    3. Taste (carefully—horseradish is bold 😄)
    4. Pour into a clean jar
    5. Label it, because Future Me deserves nice things

    That’s it. Pantry magic.


    How we use it

    This blend is basically my kitchen shortcut:

    • roasted vegetables
    • soups and stews
    • scrambled eggs
    • potatoes
    • quick buttered noodles
    • anything that needs “one shake of flavor”

    Why I love it (besides the taste)

    Because it’s:

    • homemade
    • clean
    • zero-waste-ish
    • and it makes me feel like I’m winning at winter.

    Also: it’s incredibly satisfying to say, “Oh this? I made it.” 😌


    This year’s plan: even richer blends

    I’m definitely doing this again this year—and I want it to be even better.
    My goal is to dry more variety so the blend gets deeper, richer, and more interesting.

    If you have a favorite ingredient that belongs in a seasoning mix, tell me—I’m always collecting ideas like a dragon collects treasure.


    Your turn

    Do you make your own spice blends? If yes—what’s your secret ingredient? 👀✨

  • Our Sweet Paprika Cold-Smoked Sausage (Winter Pantry Batch)

    Outside, everything is buried under snow. Inside, our pantry had a few suspiciously empty corners whispering, “You call this winter preparedness?”

    So my husband and I decided it was time to do the most logical thing a couple can do in mid-winter: make sausage.

    We started with 5 kg of pork loin, added fatback (because flavor is not optional), stuffed it, and then cold-smoked it. Honestly? It felt like one of those cozy, old-school home rituals that makes winter feel less… wintery.

    By the time the garden wakes up—when the spring onions, radishes, and salad greens start showing off—we’ll be slicing our own sausage. Future-us is going to be very pleased.


    The setup: meat, fat, and good intentions

    This batch was simple, rustic, and deeply satisfying.

    We used:

    • Pork loin (5 kg)
    • Fatback (to keep everything juicy)
    • Natural casings (we bought ours from a local butcher shop)
    • Spices (sweet paprika is the star)
    • A sausage stuffer (more on that below)


    The sausage stuffer we used (and why we liked it)

    We used this one:

    HOTMALLL 6Lbs Heavy-Duty Stainless Steel Manual Sausage Stuffer (11 tubes, vertical hand-crank)
    👉 https://temu.to/k/p8vb6l9w70s

    It was on sale, arrived quickly, and made the process feel surprisingly smooth—especially once we found our rhythm: one person guiding the casing, the other cranking like they’re auditioning for a medieval bakery.

    What I appreciated most:

    • Sturdy stainless steel build (feels solid, not flimsy)
    • Vertical design (doesn’t take over the whole counter)
    • Multiple tubes (handy for different casing sizes)
    • Cleaning wasn’t a nightmare (a true love language)


    A few things we learned (so you don’t have to learn them the hard way)

    1) Don’t skip the fat.
    Pork loin is lean. Fatback makes the texture tender and the slices actually satisfying.

    2) Keep everything cold.
    Cold meat is easier to work with and stuffs better. Warm meat turns into chaos.

    3) Go slow at the start.
    Once the casing fills evenly and you find your pace, it becomes oddly calming.

    4) Make extra.
    Because you will “taste-test.” And then you’ll taste-test again. For quality control. Obviously.


    Sweet Paprika Cold-Smoked Sausage (Printable-Style Recipe)

    Note: Cold smoking does not cook sausage. For cold-smoked/dried sausage, curing salt and proper drying conditions matter—always follow trusted local food-safety guidance for your region and setup.

    Ingredients (per 1 kg / 1000 g meat + fat)

    • Cure #1 (pink curing salt): 2.5 g
    • Salt (non-iodized): 14 g
    • Sweet paprika: 10 g
    • Black pepper: 2 g
    • Garlic: 10 g fresh, minced (or 2 g garlic powder)
    • Marjoram (optional): 1 g
    • Caraway (optional): 0.5 g
    • Ice-cold water: 30–50 ml

    Casings: Natural casings from a local butcher.

    Method (short version)

    1. Chill meat + tools
    2. Grind (medium grind works great)
    3. Mix spices + cold water until tacky/sticky (“bind”)
    4. Rest 8–24 hours in the fridge (recommended)
    5. Stuff into casings, twist links
    6. Dry 12–24 hours until casings feel dry
    7. Cold smoke below 25°C / 77°F in gentle sessions
    8. Dry/age until firmer (time varies by thickness and environment)


    Cold smoking = winter happiness (quiet version)

    Hot-smoke days are loud and celebratory. Cold-smoke days are more… patient. You check on things, you wait, you pretend you’re very calm and not obsessed with whether the smoke is “just right.”

    And then you peek again five minutes later.

    Now we’ve got homemade sausage tucked away, ready for quick meals, soups, breakfasts, and those early spring days when the garden starts producing again.


    If you want to try sausage-making at home…

    If you’re curious and want a sturdy starter setup, here’s the stuffer we used:
    👉 https://temu.to/k/p8vb6l9w70s

    And if you already make sausage, tell me your favorite seasoning combo—because we’re absolutely doing this again.


    Affiliate note:
    This post may contain affiliate links. If you purchase through them, I may earn a small commission at no extra cost to you.

    Get Your free recipe here! https://littlehomerituals.com/wp-content/uploads/2026/01/sausage-recipe-card.pdf